Using Python inside a React web app with Pyodide
- Overview
- Getting started
- Setting up Pyodide
- Configure Pyodide output
- The Python Runner Class
- Python Runner Singleton
- Using Python in React
- Using JavaScript in Python
- Converting Types
- Resetting Pyodide
- Wrapping up
Overview
I first stumbled upon Pyodide when PyScript was announced at PyCon 2022. PyScript uses Pyodide to run Python in HTML by extending the functionality of Pyodide. However, PyScript doesn't have a lot of the niceties that you get with React or the many other UI frameworks. I wanted to see if I could use Pyodide in a React web app to get the best of both worlds.
Pyodide is a WebAssembly port of Python that allows you to run Python in the browser. This is exciting because until now, Python has been limited to running on the server or in a desktop application. This means that you can now run Python in the browser without having to set up a server or install Python on your machine and that you can use Python to build web apps.
In this article, I will show you how to use Pyodide in a React web app, and how to use it to share data between Python and JavaScript.
Getting started
I set up a sample project on GitHub that you can use to follow along. The sample project covers the basics of using Pyodide, but we will talk about some additional details in this article.
You will need a recent version of Node.js installed to run the sample project. You can check your version with node -v.
This is what I currently have installed:
$ node -v
v19.5.0
After you have downloaded the sample project, you can install the dependencies with npm install.
$ npm install
and then start the development server with npm run dev.
$ npm run dev
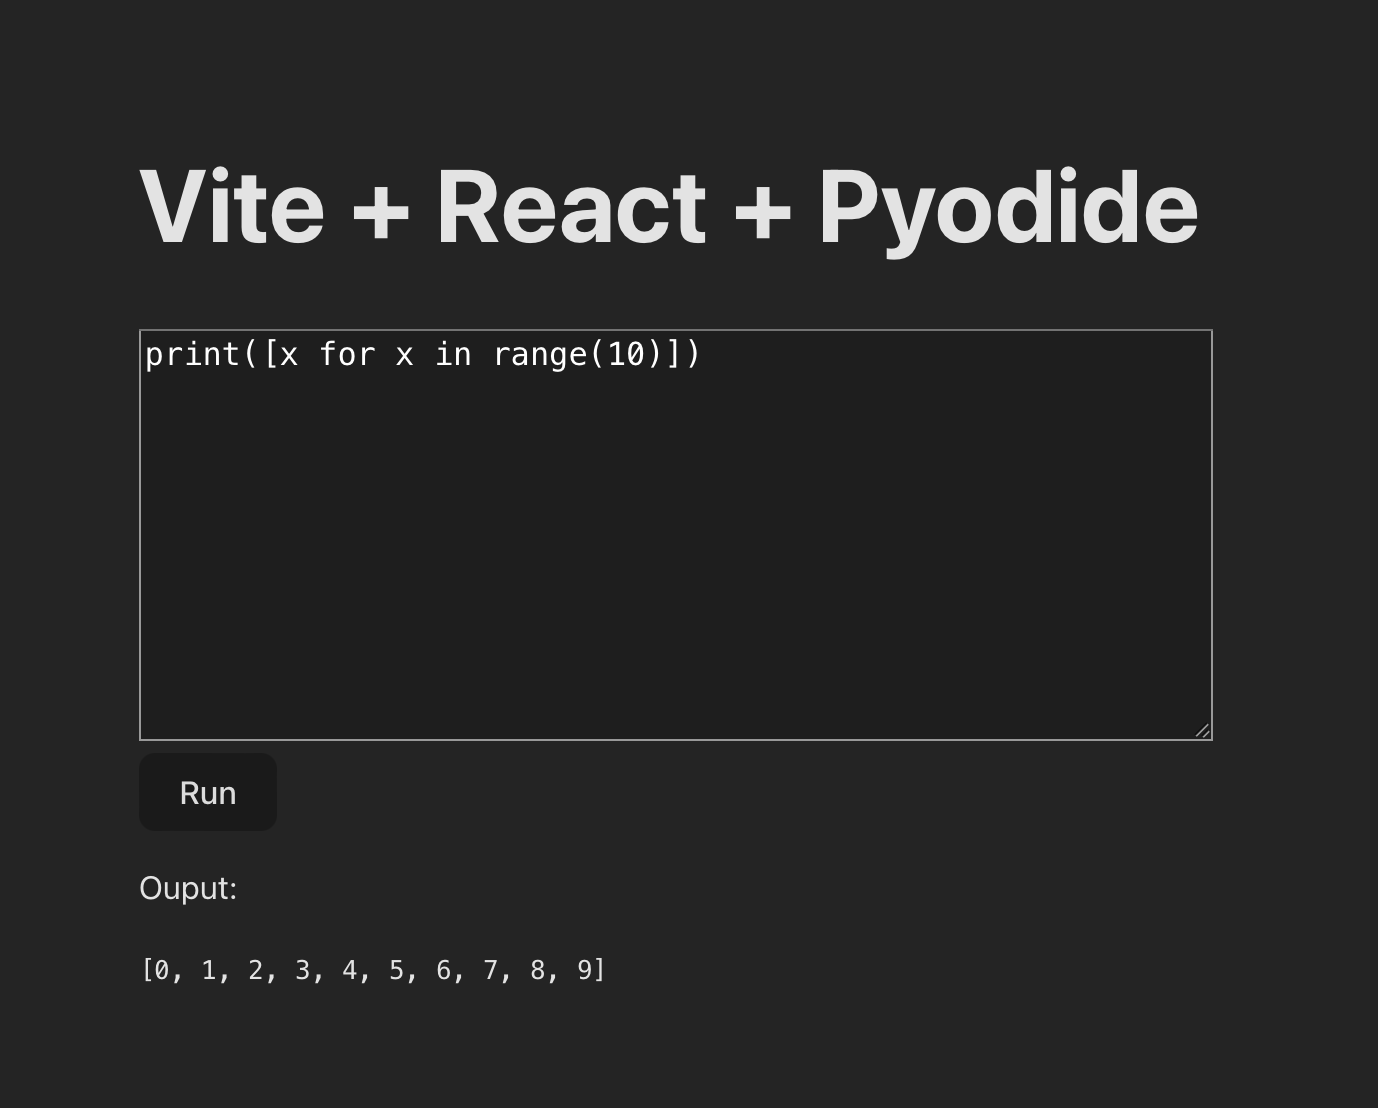
After the development server starts, you can navigate to http://localhost:5173/ to see the sample project. You will see a simple web app where you can write Python code and see the output when you run it.
Setting up Pyodide
The first thing we need to do is install the Pyodide package.
$ npm install pyodide
Once installed we can use the loadPyodide function to load the Pyodide WebAssembly module.
loadPyodide({
  indexURL: 'https://cdn.jsdelivr.net/pyodide/v0.23.2/full',
}).then((pyodide) => {
  pyodide.runPython('print("Hello from Python!")')
})
loadPyodide is an asynchronous function, we can use the then method to run code after
Pyodide has loaded to store the Pyodide reference in a variable or to run Python code like the example above.
The indexURL parameter tells Pyodide where to load the WebAssembly module from. You can find the latest version
on the Pyodide Website.
If you don't want to use a CDN, you can download and host Pyodide yourself. To do this download the contents of the full
directory and put them in a directory called pyodide in the public directory of your project. Then you can use the
following code to load Pyodide.
loadPyodide({
  indexURL: 'pyodide/',
}).then((pyodide) => {
  pyodide.runPython('print("Hello from Python!")')
})
Configure Pyodide output
There are a couple of ways to get output from your Python code. The first is to use the runPython function to get the last value returned from your code.
const version = pyodide.runPython(`
    import sys
    sys.version
`)
This will return the version of Python that is running as that is the value on the last line of the code on a single line.
const twenty = pyodide.runPython('10 + 10')
You can also get the output of your Python code by setting the stdout and stderr parameters of the loadPyodide function.
By default, Python standard out and error will be sent to the web console. You can override this behavior by setting the stdout and stderr parameters.
loadPyodide({
  indexURL: 'https://cdn.jsdelivr.net/pyodide/v0.23.2/full',
  stderr: (text) => {
    console.log('An error occured:', text)
  },
  stdout: (text) => {
    console.log('Python output:', text)
  },
}).then((pyodide) => {
  pyodide.runPython('print("Hello from Python!")')
})
You can then use those functions to send the output to the web console or a UI element.
The Python Runner Class
In the sample project, I created a class called PythonRunner that wraps the Pyodide functionality and allows you to set the output functions
so that you can change where the output is sent as needed.
class PythonRunner {
  constructor() {
    this._output = console.log
    this._pyodide = null
    loadPyodide({
      indexURL: 'https://cdn.jsdelivr.net/pyodide/v0.23.2/full',
      stderr: (text) => {
        this._output(text)
      },
      stdout: (text) => {
        this._output(text)
      },
    }).then((result) => {
      this._pyodide = result

      console.log(
        this._pyodide.runPython(`
            import sys
            sys.version
        `)
      )

      this._pyodide.runPython('print("Hello from Python!")')
    })
  }
  setOutput(output) {
    this._output = output
  }
  run(code) {
    if (this._pyodide) {
      return this._pyodide.runPython(code)
    }
  }
}
Python Runner Singleton
When using Pyodide we are creating a Python interpreter in the browser. This interpreter can be used multiple times to run Python code. As such we want to avoid creating multiple interpreters.
To do this we can use a singleton to ensure that we only create one instance of the PythonRunner class.
export var Pyodide = (function () {
  var instance
  function createInstance() {
    var object = new PythonRunner()
    return object
  }
  return {
    getInstance: function () {
      if (!instance) {
        instance = createInstance()
      }
      return instance
    },
  }
})()
We can then use the getInstance method to get the instance of the PythonRunner class, and if it doesn't exist, it will be created.
import { Pyodide } from './Pyodide'
const pyodide = Pyodide.getInstance()
Using Python in React
Now that we have Pyodide set up, we can use it in our React components. In the sample project, you will find the code in src/App.jsx
Here is what a simple component looks like:
import { useState } from "react";
import { Pyodide } from "./pyodide";

function App() {
  const pyodide = Pyodide.getInstance();
  const [pyoutput, setPyoutput] = useState(null);

  return (
    <>
      <button
        onClick={() => {
          pyodide.setOutput((text) => {
            setPyoutput(text);
          });
          pyodide.run('print("Hello from Python!")')
        }}
      >
      Run
      </button>
      <p>Ouput:</p>
      <p>{pyoutput}</p>
    </>
  );
}
export default App;
To summarise the code in steps:
- Import our
Pyodidesingleton. - Create a new instance of the
PythonRunnerclass using thegetInstancemethod. - Create a state variable to store the output of our Python code using the
useStatehook. - Create a button that will run our Python code when clicked.
- Use the
setOutputto create a function that will set the state variable on Python output. - Display the output in a paragraph element.
The sample project has a few more features like the textarea for writing Python code, but the code above is the core of how to use Pyodide in React.
Note: This only sets the last printed value to the state variable. If you want to get all of the output you can use the following code instead.
pyodide.setOutput((text) => {
  setPyoutput((prev) => (prev ? prev + '\n' + text : text))
});
Using JavaScript in Python
So far we have seen how to use Python in JavaScript, but what about the other way around?
Pyodide allows you to use JavaScript in Python using the js module.
import js
js.console.log("Hello from Python!")
Unfortunately, React obscures a lot of what is going on in components, so we need to do a little extra work to get Python to call functions in our React components.
Fortunately, we can use the window object to store a reference to our React components.
Taking our App component from earlier, we can store a reference to it in the window object, lets's adjust the app to set the state variable from Python.
import { useState, useEffect } from "react";
import { Pyodide } from "./pyodide";

function App() {
  const pyodide = Pyodide.getInstance();
  const [pyoutput, setPyoutput] = useState(null);

  useEffect(() => {
    window.setPyoutput = setPyoutput;
  }, []);

  return (
    <>
      <button
        onClick={() => {
          pyodide.run(`
          import js
          js.window.setPyoutput("Hello from Python!")
          `)
        }}
      >
      Run
      </button>
      <p>Ouput:</p>
      <p>{pyoutput}</p>
    </>
  );
}
export default App;
In the code above we are using the useEffect to set the setPyoutput function on the window object.
We need to do this inside the useEffect because the window object is not available when the component is first rendered.
Converting types
Pyodide will try to convert types for you, but when working with more complex types it will return a PyProxy object.
In the case that the type is a PyProxy object, is one of Python's built-in types list a list or dict you can just call the
toJs method to convert it to a JavaScript object. For more detail read here.
const pyList = pyodide.runPython("[1, 2, 3]")
const jsList = pyList.toJs()
Resetting Pyodide
Pyodide is a Python interpreter, and as such, it will keep the state of the interpreter between runs. This means that running the same code twice may not give you the same result. I have found that it is helpful to reset Pyodide in cases where you don't want to keep the state between runs. This is also a great place to put the setup code that you want to run before every run.
pyodide.runPython(`
    globals().clear()
    import js
`)
You can even use this function to override the built-in Python functions.
For example, if you want wanted to fix the input function to work in the browser, you could do the following.
import js
old_input_123 = input
def input(prompt=None):
  js.pyprompt = prompt
  return old_input_123(prompt)
Wrapping up
Pyodide is a great way to use Python in the browser. I hope that this article has helped you get started with Pyodide in React. It isn't perfect, but it is still great to have the ability to use Python in the browser. I am excited to see what people build with it.